Skull Finder Puzzle Walk Through

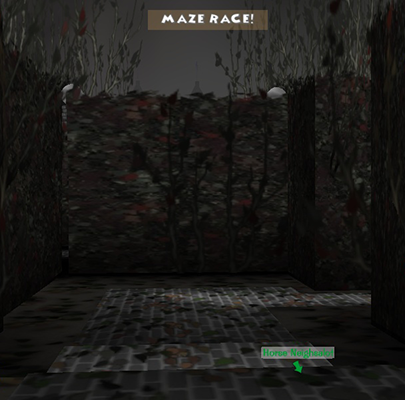
Here is another old guide I dug up from my computer. Skull Finder was/still is my favorite game in DA offices! 🙂

skullfinderbanner_zps724fd6ee

Dedicated to Rob, still.
Because he needs it the most.

7x7_zps6810350f
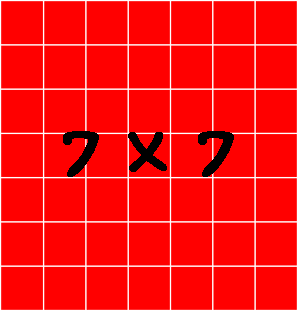
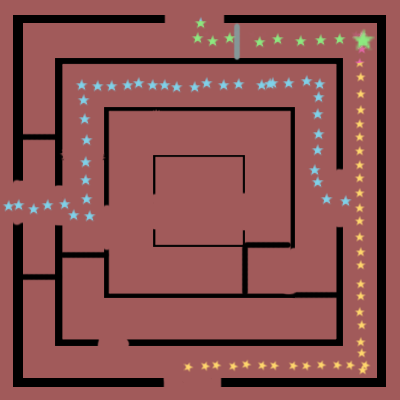
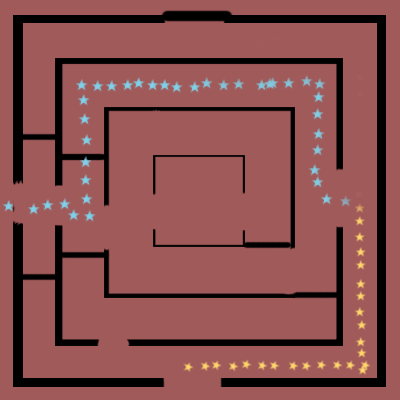
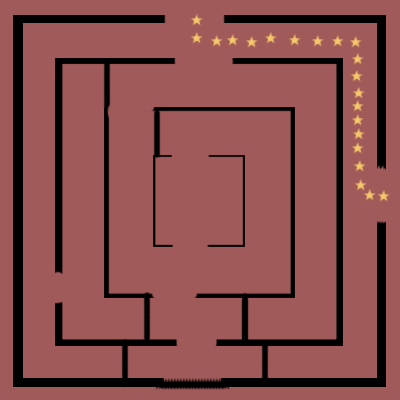
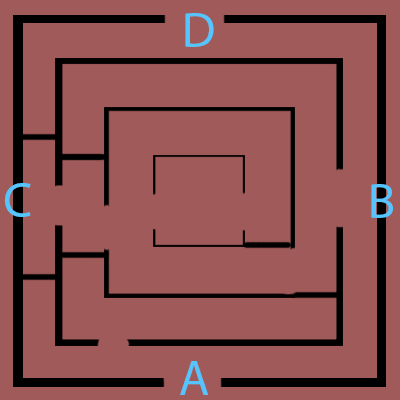
This is your typical Skull Finder board in a DA office.
There are a total of 49 squares, 7 of which are always skulls.
The object of the puzzle is to avoid the skulls and reach the other side of the puzzle, if you touch a skull you set off the cogs.
(For reference the top of my images will always be where the button is)

If you know how to play mine sweeper (a game installed on most computers) you’ll already be very good at this game because it’s almost the exact same.

If not, here are some brief instructions.
Each number shows how many skulls are touching it, including diagonals.
So, hypothetically the largest number you can have is an 8, meaning every single box around it is a skull. Like so:

iftherewere8_zpsbe8fd707

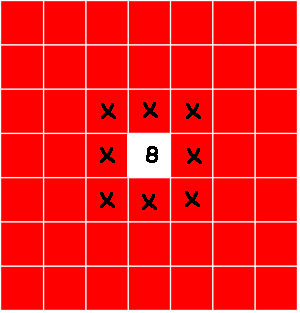
Obviously, this is impossible because there is no way you could touch this box on Toontown where you have to work your way from front to back and cannot jump over squares.
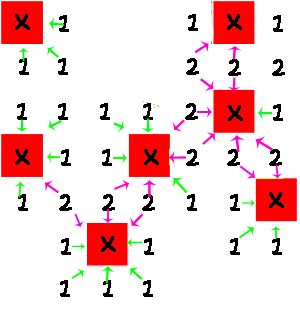
If we were to open up all of the other squares around this the numbers would like this:

8-2_zps832828a7

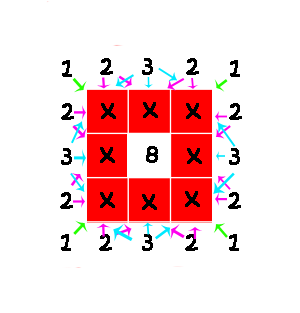
  • The ones in the corners are only touching one skull each diagonally, these are marked by green arrows.
  • The twos are each touching two skulls each one right next to them and one diagonally from them marked by pink arrows.
  • Finally the threes are touching three skulls each, marked by light blue arrows.

Remember, this is a hypothetical situation and would never actually happen in game. 

The largest number you would run into on Toontown is a Four.
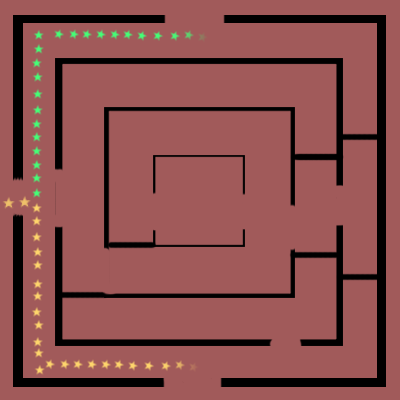
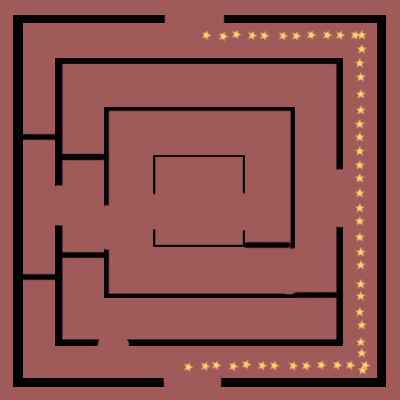
So let’s try a real puzzle.

row1clear_zps526a7ef6

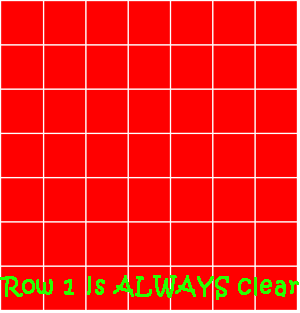
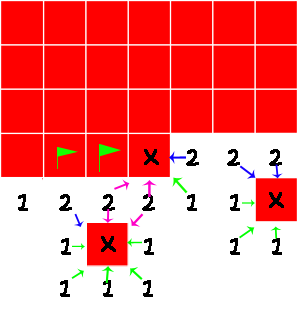
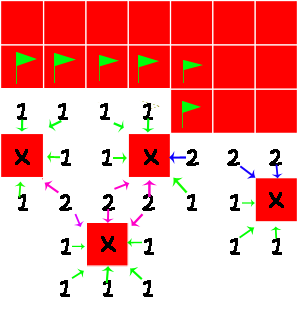
The game wouldn’t really be fair if you had to guess, so let’s open up that first row.

row1gone_zps42deb44a

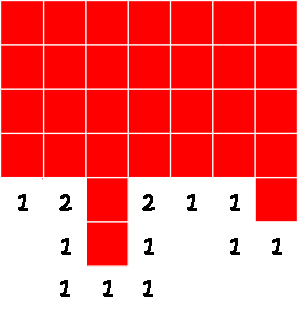
From here you should be able to pick out 2 skulls already, and identify which squares are clear to step on.
Remember each number relates to how many skulls it’s touching. If the number is a 1 and the skull has already been identified all other squares around the 1 will be clear.

Markings:

  • Clear squares = Green FlagsGreen Arrows = Point from a 1 to the corresponding skull
  • Blue Arrow = Point from a 2 and identifies one of the skulls it corresponds with but the second skull hasn’t been identified yet
  • Pink Arrows = Point from a 2 in which both skulls have been identified to the skulls

mentalmap1_zps03633b9b

If you figured all that out you’re in good shape.
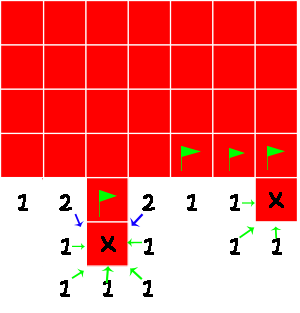
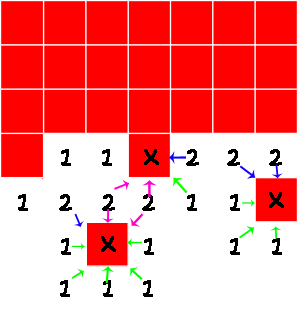
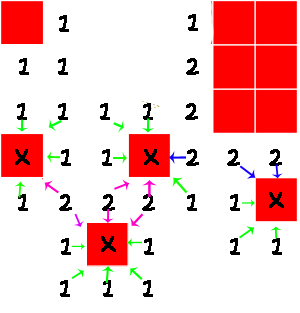
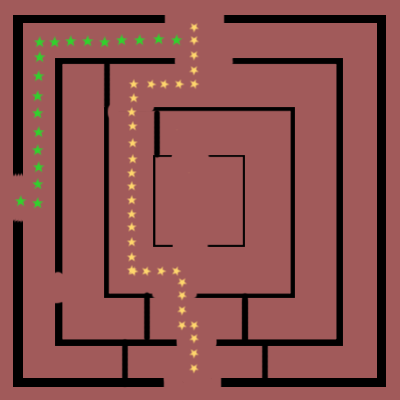
By removing all the clear squares the game changes:

reveal1_zpsb1c2b67d

Try to figure out which square is definitely a skull, then click on the spoiler to see if you were right.
You will get the most out of this guide if you try it for yourself first and then see if you were right.


mentalmap2-1_zpsfdfa91e4

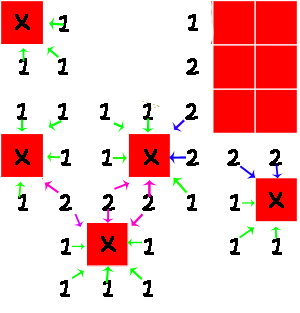
Good job if you got it!
If not, you can tell that one is a skull because it’s the only box the number one is still touching that hasn’t been revealed, and since that 1 isn’t already touching a different skull you know the box connected diagonally to the 1 is the skull.

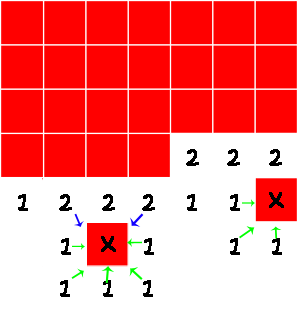
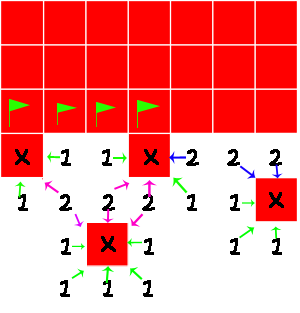
Now from there you should be able to figure out that:

mentalmap2-2_zps40191672

The two 2’s with pink arrows are now touching their allotted 2 skulls each. So any other boxes touching them must be clear.
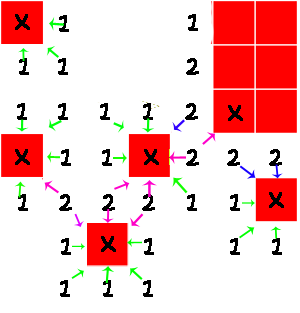
By clearing these two boxes we arrive at this:

reveal2_zps4e0d3ac7

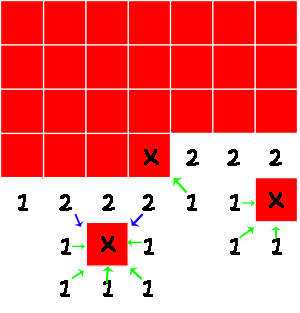
Now you should be able to pick out another skull. (Try it yourself before you scroll!)
mentalmap3-1_zps5f023ae7

If you don’t understand why the box on the far left is a skull here’s the explanation, otherwise you can skip down a little.
The 1 underneath it is only touching one more box that hasn’t been revealed and isn’t touching any other skulls. You could have also figured it out by using the 2 next to this 1, because that two is now only touching two unrevealed boxes and must be touching 2 skulls as well.
You can also mentally draw in the green arrows from both of the ones we just revealed because you already know which boxes they are touching are skulls.

mentalmap3-2_zps9da61979

Meaning, the following boxes must be clear since they are also touching those Ones.
Opening those we find:

reveal3_zpsd9f10ddd

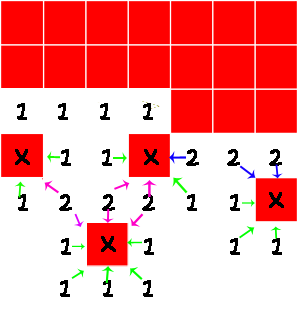
We can’t pick out any new skulls, but you should be able to identify each skull the new squares correspond with. Like this:

mentalmap4-1copy_zpsd9d73f0d

Showing that most of the row behind them is clear.

mentalmap4-2_zps33759c20

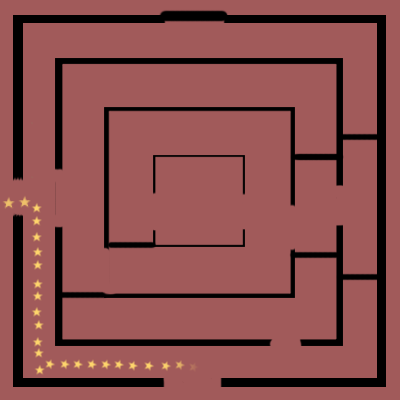
And after stepping on all of those..

reveal4_zpsb8773ee4

Woohoo! We found empty squares and can now run to the button!

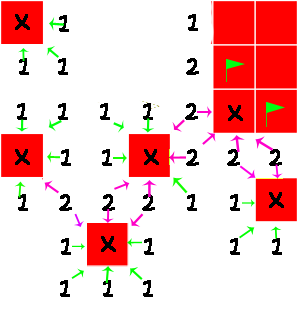
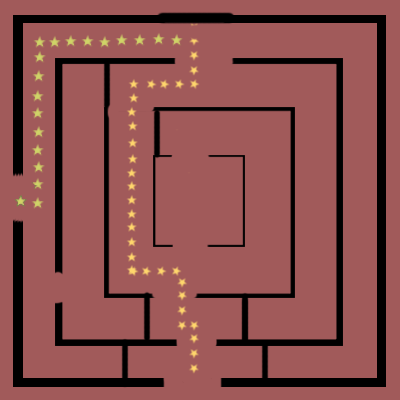
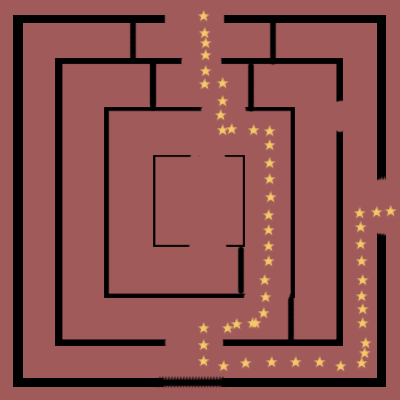
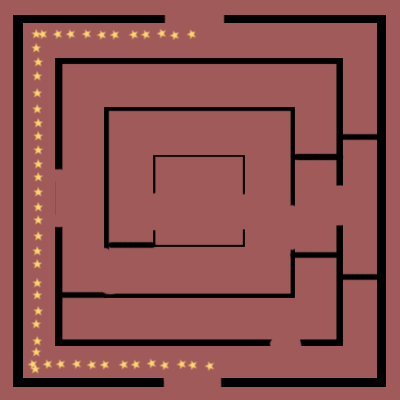
At this point you would be done with the puzzle, but I’m going to go ahead and open up the entire puzzle.

Find the easy skull first.
mentalmap5-1_zps23ac3322

Often times you will have to go to the other side of the puzzle towards the beginning, if you can’t figure one side out. If you’re stuck always try going back and working your way up the other side of the puzzle.

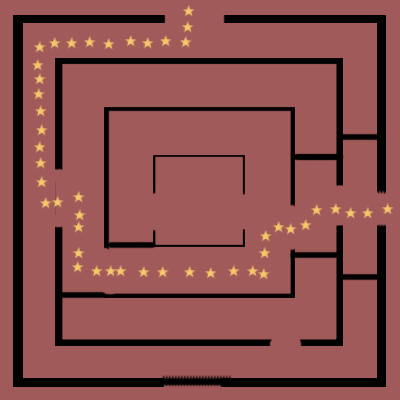
You can also identify another skull on the right side.
mentalmap5-2_zpse3e001ef

You had to use the two to the right of the skull that’s in the center of the puzzle to figure that one out.
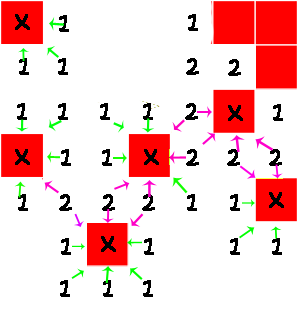
From there you can pick out more clear squares.

mentalmap5-3_zpsd1c9e4d0

And revealing them…

reveal5_zpsce7ac6d3

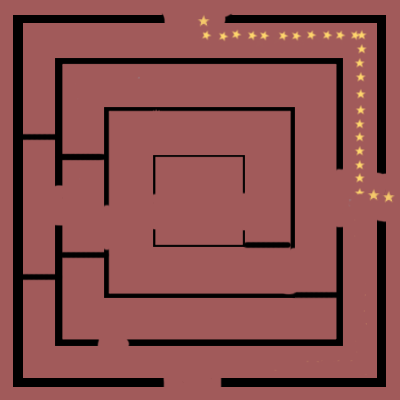
Try to pick out the last skull by yourself again.
mentalmap6-1_zps708071e7

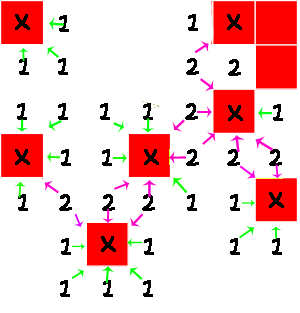
You needed to use the 2 that was 2 down and 3 from the right (the one that has the pink arrows drawn from it) to pick out the skull.
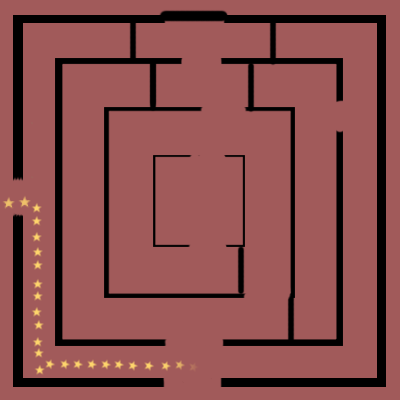
Now, if you were counting you would know you’ve already found 7 skulls at this point so you can say the following:

mentalmap6-2_zpseffd6050

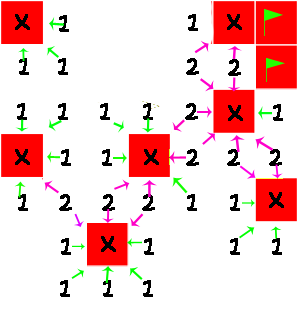
Which inevitably leads us to the fully solved puzzle:

final_zpscd6266ff
(Disclaimer- This puzzle was in an actual office on TTO)

I hope you enjoyed my guide!

Day 58 – erm 59?

Looking for content suggestions, so if you want to see anything specific in a post please let me know! 🙂 Sorry I haven’t posted in awhile, between moving and a new job orientation and trying to work on my toon things have been rather hectic.

Ivanna is at 131 HW50, RB50, BW30, BC50, 70/70 fish, 24/30 golfing trophies, 0/18 racing trophies.

I don’t believe I’ve posted since I maxed boss so it’s definitely been awhile! With OMGcon right around the corner and the schedule finally officially posted I am SUPER excited to be going and sweating a little bit wondering if i can max by then. Cait (Galbatorix), her brother, Brennen (The Doctor) and Julie (Spotty Picklecrash) will all be officially at OMGcon with me and giving a strong showing for the Soundless Cult. We are planning on attending all the events with some pretty fun cos-plays. Here’s some pictures Julie and I got from last year!


And just in case you haven’t seen the schedule yet..
Straight from the TTR Website


Gag Math: v2.0 Explained & Strategies

If you haven’t looked at my Beginners Guide to cog math you should check that out first!

Now, I’m not going to lie, you can certainly get through boss without knowing v2 math (God knows I did twice on TTO). But, that being said, it may make your life a little easier. So if you’re comfortable with regular gag math you may as well learn this too!

Unlearning The Status Quo

Use Cake on a lured level 10 v2
100 + 50 = 150
v2 has 264 health so
264 – 150 = 114 left
THIS IS NOT HOW LIFE WORKS (sorry 😦 )

TTR works more with a check system. Every time damage is applied the game asks itself “Is the cog dead yet?” So the above situation would go more like this:

100 dmg Is it dead yet? No.
50 knockback. Is it dead yet? Yes
Spawn second layer with 132 health. So now instead of 114 you have 132 dmg leftover.

Carryover is, unfortunately, not as easy as it sounds.


The Strange and the Stranger

Now the last part doesn’t look so bad, but this really starts to turn into a numbers game because you have constantly be thinking about damage order.
Lets use the example of a hose and 3 clouds on a lured level 12 v2.0.

  1. Lowest to Highest Level Gag Damage (Red damage in order)
    • Hose damage is applied before all cloud damage
    • 30 + 80 = 110 + 80 = 190 + 80 = 270 First Layer is Dead
  2. Same Gag Track Bonus (Yellow Damage)
    • 270 x .2 = 54 
  3. Lure Knockback Bonus (Orange Damage)
    1. 270 x .5 = 135 + 54 = 189 = 11 Damage Remaining.

Disclaimers:

  • If you use multiple sound gags the damage is shown together (2 fogs is shown as 100 dmg). However, the damage is still counted separately (50 and then 50).


Common Combinations

Level 10 v2.0

  • 2 cakes on a lured cog
  • 3 pies (Cream or fruit) and a cake on a lured cog
  • 4 organic cream pies on a lured cog
  • 2 clouds and a hose on a lured cog

Level 11 v2.0

  • 2 cakes and a cream pie on a lured cog
  • 3 clouds on a lured cog
  • 2 clouds on a lured cog and a safe

Level 12 v2.0

  • 3 cakes on a lured cog
  • 2 cakes on a lured cog and a safe
  • 4 Clouds on a lured cog
  • 1 hose and 2 pianos

Day 21: Real Life is a Pain

Well, good news is I survived my finals week and made it out with 4 As and 2 Bs (roughly). Bad news is I didn’t get to enjoy TTR last week :/

Ivanna @ HW19, RB50, BW19, and BC45. 67/70 fish!

My plans of finishing boss by this weekend have been crushed, but that’s okay. I will hopefully finish sometime this coming week 🙂 I will also be working on a v2 math guide, to help explain the all-powerful and mysterious carry over math in lieu of finishing up boss.


Maze Maps – Quad Monsters

Quad Monsters

The menace of the Back Nine

**Fun Facts**
1. Before you enter a quad you will see this random tree:
thesign_zps8yxtvxy1

2. The timer on Quads is glitched. It has been since the beginning of time on TTO and still is on TTR. You will be teleported to the end when there are 15 seconds left if you haven’t finished yet.

I call these quads because there are technically 4 mazes together, but you will only ever have to go through 3 at a time.
Just an example, and quadrant labels:
quadmaze_zpse0ohblu7

You will never in the same maze have to go through quadrants 2 AND 3, only one or the other.

The rest of my guide is divided by the quadrant you are entering.
Primary routes are marked in yellow, if these paths are blocked THEN use the blue or green path.

There may be other ways to solve a certain maze. These are just the ways I always go that always work. 🙂

Quad One

What You See at the Start Where You’re Going
entrblank_zpsoahw9mxl1 maze1q1_zpsxqfpfhed

This is the most confusing map here I promise.
Please proceed normally to large green star. STOP and look to your left.
If you see this bush circled in red turn around and take the alternate path in blue.
hintm1q1_zpstaik0t9p

If there is not a bush continue forward on normal path THROUGH the fake wall.

What You See at the Start Where You’re Going
entrvines_zpswxaephm71 maze2q1_zpshwhzxopd
entrsingle_zpsybxfaq6w1 maze3q1_zpsllinrtcq
entrquad_zpsuubi8fjz1 maze4reg_zps3ijxl5et1


Quad Two

What You See When you ENTER Where You’re Going
entrblank_zpsoahw9mxl1 maze1q2_zps70fgwrwp
entrvines_zpswxaephm71 maze2q2_zpsvodatcgu
entrsingle_zpsybxfaq6w1 maze3q2_zpsf1b5jzjl
entrquad_zpsuubi8fjz1 maze4q2_zpseszaaabi

Quad Three

What You See When you ENTER Where You’re Going
entrblank_zpsoahw9mxl1 maze3q3_zpsdgvwkg1g
entrvines_zpswxaephm71 maze4q3_zpsxhby1zdn
entrsingle_zpsybxfaq6w1 maze2q3_zpsl7skhwmj
entrquad_zpsuubi8fjz1 maze1q3_zpsplojcvdo

Quad Four

If you’re entering the maze from Entrance A use normal (NOT Quad 1) maze solutions.

If you’re entering the maze from Entrance B use Quad 3 solutions.

Here are the Entrance Labels one more time:
entrlabels_zps6zcr952s1

Bossbot HQ Maze Maps – The Basics

Since I’m still working boss I figured I would push out my maze maps. I’ll have the quad solutions up tomorrow!

Because TTR doesn’t have GoogleMaps, you instead can enjoy my fabulous graphics!
Maps not exactly works of art, but should give you the general idea of the lay out of mazes.

There are 3 different maze sizes, singles, doubles, and quads.
You will only see double mazes in The Middle 6 and The Back 9, and you will only see quads in The Back 9.
Doubles are just two single mazes put back to back.

If you finish a maze first you will regain any and ALL of your missing laff points.
If you finish a maze after first you will regian up to 20 laff points.
Finally if you don’t finish at all you will be teleported to the end of the maze and lose 20 laff points.

entrlabels_zps6zcr952s
For reference here, you will always enter a maze at point A, and finish at point D.
If you’re in a quad maze you may also enter a maze from point B, and exit a maze from point C.

Unless you’re in a quad you only have to worry about 4 possible mazes.

What You See at the Start Where You’re Going
entrblank_zpsoahw9mxl maze1reg_zpsnqeoln8x
entrvines_zpswxaephm7 maze2reg_zpseslni6ir
entrsingle_zpsybxfaq6w maze3reg_zpsaaqovvsz
entrquad_zpsuubi8fjz maze4reg_zps3ijxl5et

Quick tip for memorizing:
If you see leaves (vines like in the second picture above) you go left. Leaves go left.

I hoped this helped! These mazes are the building blocks into quads, so start by memorizing these and then check out my other post! 🙂

How to Crane

So someone commented on this old gem of a video of mine today.

I decided I may as well post it up on here as the information is still relevant on the Toontown Rewritten server. Just ignore the stuff about river/servers!

Also as a credential update, I did end up soloing the CFO:

Hopefully the tutorial was helpful! 🙂 Good luck craning!

Day 9: So Glad I’m Not at Cash


122 and HW19, RB50, BW19, and BC37 (basically 38). I’ve caught about 300 buckets in The Brrrgh so far but no luck with Grizzly. Boss is slightly painfully slow.

I’m in what I’ve dubbed a “Silent Back 9” because we’re on floor 3 and nobody has spoken since we started, despite my 4 attempts at conversation/joke/direct questions. Not entirely sure if they’re angry at something or have forgotten how to type.

But really the title of this post, I’m SO glad I don’t have to work cash right now. There are several cult members doing mints and (trust me) cash is upholding its reputation as least friendly soundless environment.

So we (The Cult) decided to relax and have some fun last night with a CFO marathon of our own. We had a bunch of toons in and out, but the coolest part was that our elevator was a majority soundless toons on every run! I think our fastest run with 12:23 (according to The Doctor aka Brennen aka the guy that does math well). Here’s one of our later runs featuring us telling jokes and partially yelling at each other!

The Cult is getting ready to make our first appearance at Toonfest too with T-shirts and hopefully some really cool in-game type accessories. Super pumped!! Less than 2 months out now 🙂

(Update: after asking 3 times one toon in my Back 9 begrudgingly told me his fog count. Seems to be moving in the right direction.)

Double Soundless Runs

Double Soundless runs, or runs without four toons can be a bit more complicated than regular runs. There aren’t that many sound combinations that will effectively take out larger cogs.

A few that may come in handy:

aoogah_zps11d3ea6d + trunk_zpsc7d3bb92 will take out a level 5.

trunk_zpsc7d3bb92 + trunk_zpsc7d3bb92 will take out a level 5.

trunk_zpsc7d3bb92 +fog_zpsedc8cda5 will take out a level 7.

trunk_zpsc7d3bb92+ fogo_zps36081127 will take out a level 8.

fog_zpsedc8cda5 + fog_zpsedc8cda5 will take out a level 9.

fogo_zps36081127 + fogo_zps36081127 will take out a level 10.

opera_zps83bcd9e3 + fog_zpsedc8cda5 will take out a level 11.

opera_zps83bcd9e3 + opera_zps83bcd9e3 will take out a level 12.


These runs CAN take longer than a normal run but it really depends on how well everyone knows strategies and their willingness to use said strategies. (Normally, I tend to stand aside and let the other soundless go first with another group as most people won’t run with 2 soundless.)

If you do end up going double soundless here are a few quicker ways to take out sets of cogs:

  • Have one person Trunk and use pianos on three of the cogs.
  • Have one person lure and three of you TNT different cogs.
  • Whoever joins first lures and everyone passes, then take out all the cogs with cakes or storms in one go. (This saves time in cog animations.)
  • If you’re running low on gags remember more basic combinations (like that 3 creams take out a 12 and 2 creams can take out a 10).
  • SOS cards or using a level 7 gag is always an option too.

Good luck!

Bossbot HQ Soundless


Boss is going to require a large amount of time, and a lot of attention. It’s probably the most challenging suits to work on a soundless, not because of the toons attitudes but the amount of strategy involved.

 I’d recommend working this boss last. You’ll need experience for this, and quick thinking.

Cog Golf Courses

  1. When running in Cog Golf Courses you’ll want to take around 40-70 gags in with you.  (I’ve gone in with as few as 28.)  This is because you want to have gag slots open to win back gags during the cog golf. (If you use 1 gag first round and solve 4 puzzles you’re only winning one gag back because you only have one slot open.)
    I usually go into a Back 9 with a set up similar to this:
  • 1 Juggling Set (You’ll get toon ups from finishing mazes and cog golf puzzles)
  • 2 TNT
  • 3 Hypno, 1 Bill, 2 Magnets
  • 3 cake, 7 Cream
  • 3 Storm, 7 Hose
  • 3 Piano, 4 safe
  1. I wouldn’t recommend going into a Back or Middle unless you are giving it your full attention. The v2 math confuses people and you being soundless unfortunately confuses people more, you need to be prepared to suggest strategies.
  2. Toons will usually sound whenever they have enough fogs to get rid of a set (2 Fogs and 1 Trunk for the first set, 3 Fogs for the second set).
  3. Save your pianos for the first set of cogs, if you use it all the time you will run out just as quickly as a toon with sound runs out of fogs.
  4. When toons use 3 fogs on the second battle you probably want to lure. (You can TNT one of the versions, the TNT will reappear after the cogs explode the first time.)
  5. Be proactive, make sure to ask before battles if your group has enough fogs so you won’t be making last second choices. (It helps to keep track of your teammates fog count.)


  1.  Communicate with your team, this isn’t a time to be anti-social! Make sure everyone knows how many fogs you have, and you know how many they have.
  2. There will be battles you have to lure, yes sometimes even in Front Threes. Generally this will be at least at the end every other floor in a Back Nine. It might be helpful to adopt the DA tactics of sounding the first set and luring the second.
  3. Do not go in with a full gag bag! Frankly, I would recommend this for EVERY back you go into, however it is even more important when running with a soundless. Coming in with less gags gives you more space in your bag and a bigger chance of earning back fog.
  4. No, soundless toons are not going to skip the puzzles. They need gags too, like TNTs, Pianos, etc. Yes, it may sound like a good idea, but in the end you’re just going to end up running out of gag room faster, and taking longer since the soundless toon will run out of their big gags.

Sound combos:

fog_zpsedc8cda5 + fog_zpsedc8cda5 + trunk_zpsc7d3bb92 will take out the level 10 set.

fog_zpsedc8cda5 + fog_zpsedc8cda5 + fog_zpsedc8cda5 will take the level 11 set.

fogo_zps36081127 +fogo_zps36081127 + trunk_zpsc7d3bb92 will take out the 11 set as well.


The CEO

The CEO is the longest boss runs you’ll go on. There is also more strategy involved because of the added version2.0 cogs.

  1. This is definitely most involved boss battle for soundless toons, it can be challenging but very rewarding.
  2. In here you’ll have the choice of knocking out a higher level cog (like in the CJ) and also knocking out a Version2.0 (like in Cog Golf Courses). Choose wisely.
  3. Toons will probably adopt the “One fog rule” The problem with this is 90% of the time it is not going to knock out the entire row of cogs. As long as they have fogs you’ll be using toon-up or knocking out one of the larger cogs.
  4. After running out of sound normally the lure left, kill right method is used. However, this can get a little confusing, the goal of lure left kill right is to not have any of the cogs wake up, but if the versions are being relured it makes everything more complicated. You’re going to have to keep track of how long each cog has been lured roughly, or try to take out the second layer of the cog in the same round.
  5. Conservation of gags in key in here. What do I mean? 
    • Finishing off a level 11 cog with a piano when he only has 46 hit points left, common after toons use a fog and 2 trunks, is NOT efficient. Use your safe. (This one really annoys me guys, please.)
    • Are toons missing 20 health or 60? You’re going to run out of juggling awful fast if you’re healing every other turn, and slowing the battle down. Use toonup sparingly, many toons in boss don’t mind sitting at around 60 laff.
  6. Take out the cog that will hit you before you take out the version 2.


  1. Yes, you can still use the “one fog rule” in the first round. But please rethink your choices on using 1 fog on a row of 11s
  2. If the second round is Big Cheese cogs you can still do three fog at a time, a few cog attacks won’t hurt. However if someone is opposed to this please be considerate and lure instead (it should be a group decision to go ahead with this).
  3. After you run out of fog from the ‘one fog rule’ in the first round, the soundless toon may be running low on higher level gags, don’t expect them to be able to drop a piano on everything that comes flying in.

It’s very possible you will run low on gags in this, come prepared, and don’t assume anyone is going to unite gags after this first round.

Sound Combos for the CEO:

trunk_zpsc7d3bb92 + trunk_zpsc7d3bb92fog_zpsedc8cda5 will take out a level 9.

trunk_zpsc7d3bb92 + fog_zpsedc8cda5 + fog_zpsedc8cda5 will take out a level 10.

trunk_zpsc7d3bb92 + fogo_zps36081127 + fogo_zps36081127 will take out a level 11.

fog_zpsedc8cda5 + fog_zpsedc8cda5 + fog_zpsedc8cda5 will take out a level 11.

trunk_zpsc7d3bb92 + trunk_zpsc7d3bb92 + opera_zps83bcd9e3 will take out a level 11.

opera_zps83bcd9e3 +fogo_zps36081127 + trunk_zpsc7d3bb92 will take out a level 12.


I will be writing later on about v2 math and some quick combos in another post to take out both layers at the same time!